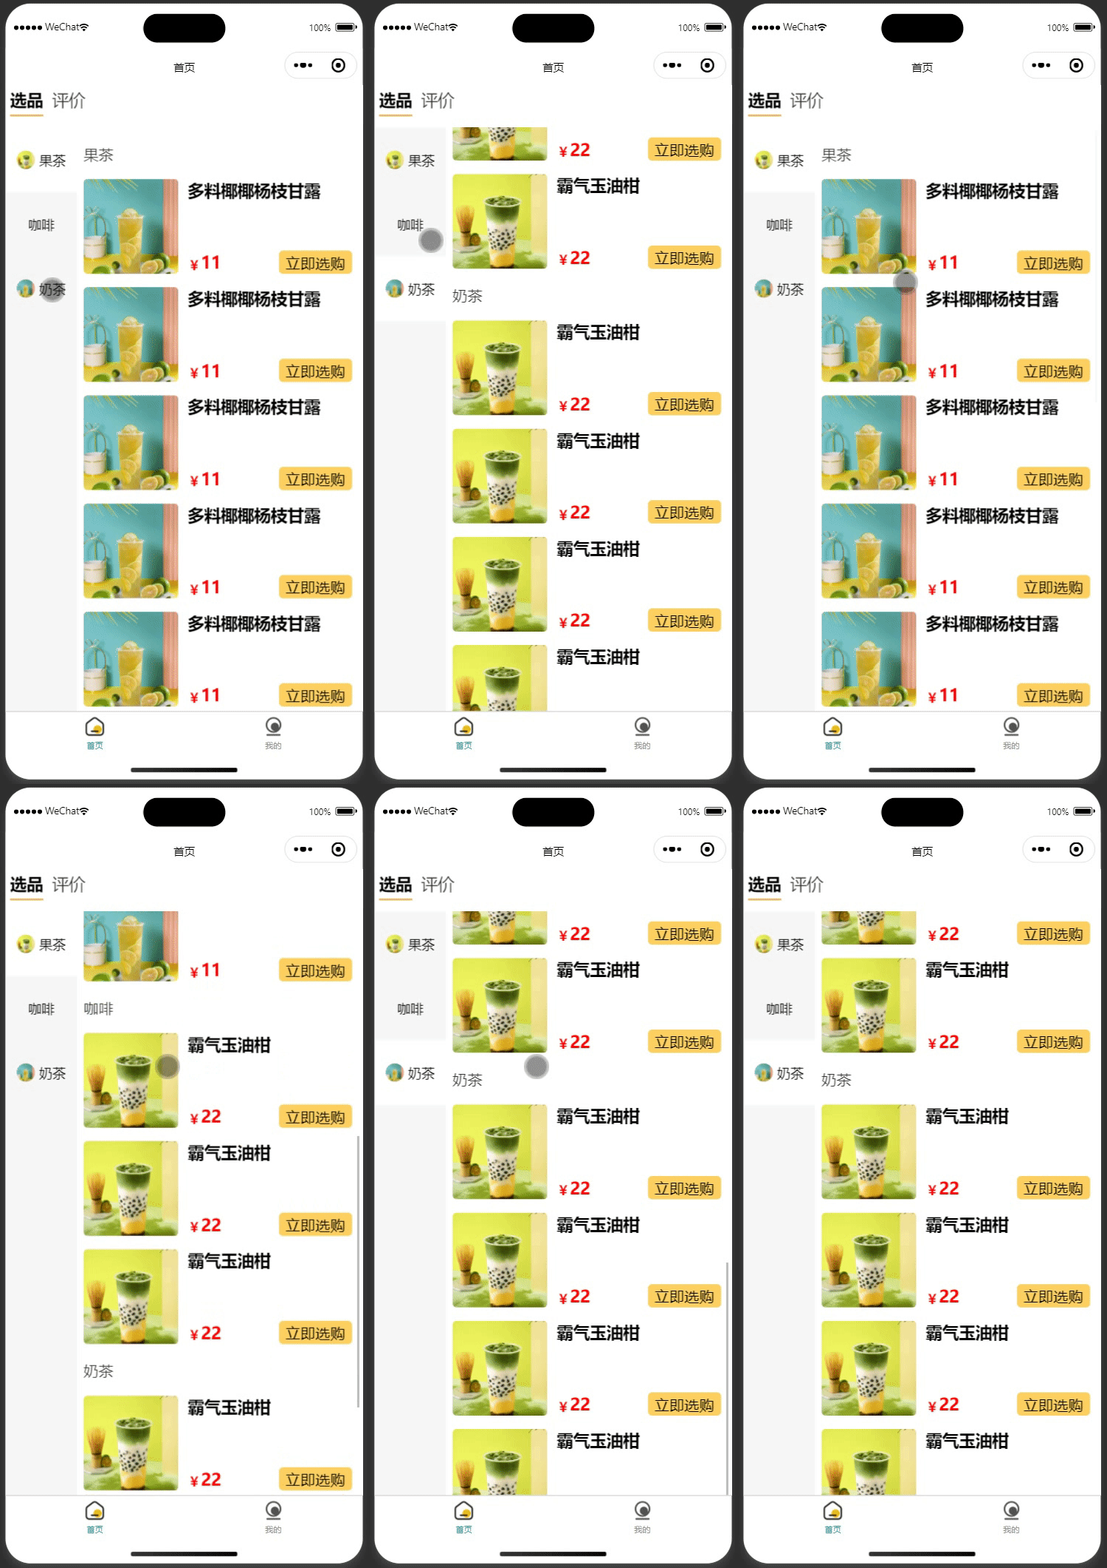
左右联动菜单
2025/6/21大约 5 分钟
左右联动菜单

搭建基本的结构,左侧(left-scroll)用于存放类别(category-section),右侧(right-scroll)用于存放商品(product-section)。类别区域中有多类别(category-item),每个类别呈左右结构(icon)和(name)。
样式
<script lang="tsx">
  import {PropType, SlotsType, defineComponent} from "vue";
  import {ScrollView} from "@tarojs/components";
  import {Product, ProductCategory} from "@/typings";

  export default defineComponent({
    name: "CategoryProducts",
    props: {
      categories: {
        type: Array as PropType<ProductCategory[]>,
        required: true,
      },
    },
    slots: Object as SlotsType<{
      default: { product: Product };
    }>,
    setup(props, {slots}) {
      return () => (
          <div class="side-menu">
            {/* 左右结构left-scroll和right-scroll */}
            {/* scrollY: 可以在垂直方向上滚动。必须指定hight的值。 */}
            <ScrollView
                class="left-scroll"
                scrollY={true}
                scrollWithAnimation={true}
            >
              {/* 左侧存放类别,所有类别垂直排列,且在水平居中 */}
              <div class="category-section">
                {props.categories.map((category) => (
                    // 每个类别左边是图标,右边是类别名字。且图标和名字垂直/水平居中。
                    <div class="category-item" key={category.id}>
                      <div class="name-icon">
                        {category.icon ? (
                            // mode={"aspectFill"} 优先保证图片的比例,无法显示的部分会截切掉。
                            <image
                                src={category.icon}
                                class="icon"
                                mode={"aspectFill"}
                            ></image>
                        ) : (
                            ""
                        )}
                        <div class="name">{category.name}</div>
                      </div>
                    </div>
                ))}
              </div>
            </ScrollView>
            <ScrollView
                class="right-scroll"
                scrollY={true}
                scrollWithAnimation={true}
            >
              <div class="product-section">
                {props.categories.map((category) => (
                    // 每个类别对应多个商品
                    <div class="category-products">
                      <div class="category-name">{category.name}</div>
                      <div class="product-wrapper">
                        {/* 商品插槽,商品的样式比较动态,留给引用方实现。 */}
                        {category.products.map((product) => (
                            <div>{slots.default({product})}</div>
                        ))}
                      </div>
                    </div>
                ))}
              </div>
            </ScrollView>
          </div>
      );
    },
  });
</script>

<style lang="scss">
  .side-menu {
    display: flex;

    .left-scroll {
      height: 100vh;
      width: 150px;

      .category-section {
        // 类别区域内的类别垂直排列且水平居中
        display: flex;
        flex-direction: column;
        align-items: center;

        .category-item {
          // 类别的图标和名字的相关样式。
          display: flex;
          padding: 50px 0;
          align-items: center;
          justify-content: center;
          width: 100%;

          .name-icon {
            display: flex;
            align-items: center;

            .icon {
              width: 40px;
              height: 40px;
              margin-right: 10px;
              border-radius: 50%;
            }
          }

          &.active {
            background-color: white;
          }
        }
      }
    }

    .right-scroll {
      height: 100vh;
      width: 600px;

      .product-section {
        background-color: white;
        padding: 15px;

        .category-products {
          .category-name {
            padding: 20px 0;
            font-size: 32px;
            color: rgba(#000, 0.8);
          }
        }
      }
    }
  }
</style>
数据初始化
想要实现点击左侧类别时,让右侧的区域滚动到该类别商品所在的位置那必然需要知道每个category-products顶部与right-scroll的距离。然后才能控制滚动条移动到相应的位置。
在右侧滚动时,也需要知道当前的商品是属于哪个类别,让左侧的类别也跟着滚动。要实现这个功能需要知道category-products顶部和底部与right-scroll的距离,这样可以知道滚动条落在哪个区间,通过区间可以反推出是属于哪个类别。
现在有三个区间:[0,100],[101,300],[300,350]。每个区间代表category-products的顶部和底部与right-scroll的距离。每个区间同时也对应一个类别。0:果茶,1:咖啡,2:奶茶。当前滚动条所在位置是200,遍历区间发现当前滚动条在[101,300]这个区间,反推得知当前区间对应的类别是咖啡。为了节流还需要知道right-scroll的高度。假设right-scroll的高度是100px,product-section的高度是300px。当滚动条滚动到200px时其实就已经到达底部了,因为200px+100px=300px。通过这个计算公式可以提前停止滚动,防止出现滚动抽搐现象。
<script lang="tsx">
  import {PropType, SlotsType, defineComponent, reactive} from "vue";
  import {ScrollView} from "@tarojs/components";
  import {Product, ProductCategory} from "@/typings";
  import Taro from "@tarojs/taro";

  export default defineComponent({
    // 忽略...
    setup(props, {slots}) {
      const scrollState = reactive({
        // 存储右侧category-products的头部和底部与product-section的距离。
        rightToTopList: [] as Array<[number, number]>,
        // 存储左侧每个category-item的顶部距与category-section的距离
        leftToTopList: [] as number[],
        // 左侧滚动区域滚动条与category-section的距离
        leftScrollTop: 0,
        // 右侧滚动区域滚动条与product-section的距离
        rightScrollTop: 0,
        // right-scroll的高度
        rightHeight: 0,
        // 当前激活的类别
        activeCategory: 0,
      });
      Taro.useDidShow(() => {
        Taro.nextTick(() => {
          const query = Taro.createSelectorQuery();
          // 对步骤1
          query
              .selectAll(".category-products")
              .boundingClientRect((data) => {
                // 第一个category-products与小程序顶部的距离(约等于product-section到小程序顶部的距离)
                const toTop = data[0].top;
                if (scrollState.rightToTopList.length === 0) {
                  if (data instanceof Array) {
                    for (let i = 0; i < data.length; i++) {
                      // 通过css选择器得到的top是与小程序顶部的距离,这步我们需要的是与product-section顶部的距离。
                      // 因此下面的top都是需要减去toTop
                      scrollState.rightToTopList.push([
                        // 计算得到顶部和 product-section 的距离。
                        data[i].top - toTop,
                        // 计算得到底部和 product-section 的距离。
                        data[i].top + data[i].height - toTop,
                      ]);
                    }
                  }
                }
              })
              .exec();
          // 对应步骤2
          query
              .selectAll(".category-item")
              .boundingClientRect((data) => {
                // 第一个category-item到小程序顶部的距离(约等于category-section到小程序顶部的距离)
                const toTop = data[0].top;
                if (scrollState.leftToTopList.length === 0) {
                  if (data instanceof Array) {
                    for (let i = 0; i < data.length; i++) {
                      // 计算得到 category-item顶部到category-section的距离
                      scrollState.leftToTopList.push(data[i].top - toTop);
                    }
                  }
                }
              })
              .exec();
          // 对应步骤3
          query
              .select(".right-scroll")
              .boundingClientRect(
                  (data: Taro.NodesRef.BoundingClientRectCallbackResult) => {
                    // 右侧的高度(不是滚动区域的总高度)
                    scrollState.rightHeight = data.height;
                  },
              );
        });
      });
      return () => (
          //  忽略 JSX内容
      );
    },
  });
</script>


<!-- 忽略样式...-->
逻辑实现
- 在left-scroll和right-scroll分别增加了
scrollTop={scrollState.leftScrollTop}和scrollTop={scrollState.rightScrollTop}用于控制滚动条的位置。比如修改scrollState.leftScrollTop=0,那么左侧类别区域的滚动条就会滚动到顶部。 - 当点击左侧的类别时会触发leftClick,该方法会切换激活的类别并且将右侧的商品区域滚动到该类别所在位置。参考上面的1
- 当右侧商品滚动时,联动左侧类别一起滚动。参考上面的2,3
<script lang="tsx">
  import {PropType, SlotsType, defineComponent, reactive} from "vue";
  import {ScrollView, ScrollViewProps} from "@tarojs/components";
  import {Product, ProductCategory} from "@/typings";
  import Taro from "@tarojs/taro";

  export default defineComponent({
    // 忽略...
    setup(props, {slots}) {
      // 忽略...
      const leftClick = (index: number) => {
        scrollState.activeCategory = index;
        scrollState.rightScrollTop = scrollState.rightToTopList[index][0];
      };
      const rightScroll: ScrollViewProps["onScroll"] = (event) => {
        const scrollTop = event.detail.scrollTop;
        // 滚动到底部了
        if (scrollTop + scrollState.rightHeight >= event.detail.scrollHeight) {
          scrollState.leftScrollTop =
              scrollState.leftToTopList[scrollState.leftToTopList.length - 1];
          scrollState.activeCategory = scrollState.leftToTopList.length - 1;
          return;
        }
        // 判断当前滚动条在哪个商品区间
        for (let i = 0; i < scrollState.rightToTopList.length; i++) {
          if (
              scrollState.rightToTopList[i][0] < scrollTop &&
              scrollState.rightToTopList[i][1] > scrollTop
          ) {
            scrollState.leftScrollTop = scrollState.leftToTopList[i];
            scrollState.activeCategory = i;
            break;
          }
        }
      };
      return () => (
          <div class="side-menu">
            <ScrollView
                class="left-scroll"
                scrollY={true}
                scrollWithAnimation={true}
                scrollTop={scrollState.leftScrollTop}
            >
              <div class="category-section">
                {props.categories.map((category, index) => (
                    <div
                        class={[
                          "category-item",
                          scrollState.activeCategory === index ? "active" : "",
                        ]}
                        key={category.id}
                        onClick={() => {
                          leftClick(index);
                        }}
                    >
                      {/* 忽略... */}
                    </div>
                ))}
              </div>
            </ScrollView>
            <ScrollView
                class="right-scroll"
                scrollY={true}
                scrollWithAnimation={true}
                scrollTop={scrollState.rightScrollTop}
                onScroll={rightScroll}
            >
              {/* 忽略... */}
            </ScrollView>
          </div>
      );
    },
  });
</script>


<!--忽略...-->